Hi everyone, I hope you had a fantastic Weekend!
As for me, I’ve been playing with some glasses and food colouring, not to mention Photoshop.
As you may know, if you follow me on Social Media Websites, I have been playing with some still life.Its very rewarding and interesting as I get to understand a lot more of how lights work in different surfaces and working with some reflections it takes the learning to the next level.
So, this weekend I decided to create something a bit more dynamic!
The first step was to get some Red, Green and Blue food colouring, this way I could create an RGB image.But just photograph 3 glasses with some coloured liquid felt too simple, so I decided to play with gravity…
The setup was very simple, a small black gloss table and a Soft box just behind it with my speedlight at 1/4 of power.
I had my camera on a tripod with a 105mm macro lens as the glasses were “Port glasses”, therefore quite small.
I shot the images at 1/150th of a second as I wanted to get the least amount of ambient light as possible at ISO 100 and F/11
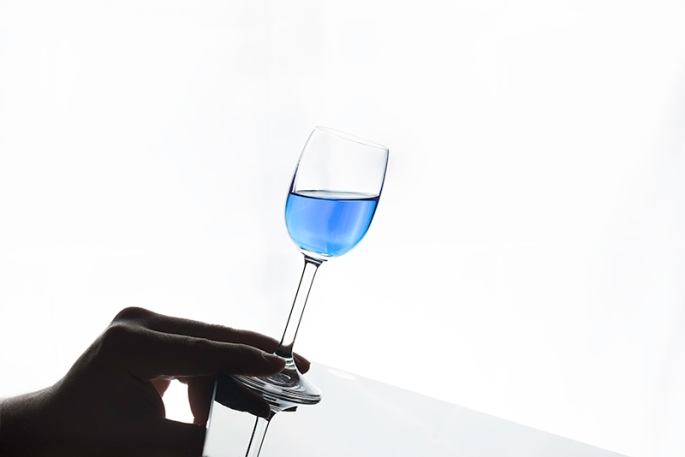
So here is the first shot

As you can see, it looks decent, but I knew I could make it more interesting…
So, I grabbed a small cardboard box and put it underneath one side of the legs of the table, this way the table had an inclination of around 30 degrees.Having the table ready I started taking some photos of individual glasses, like this…


Now all I had to do was to take all the images to Photoshop and bring all of those images together.
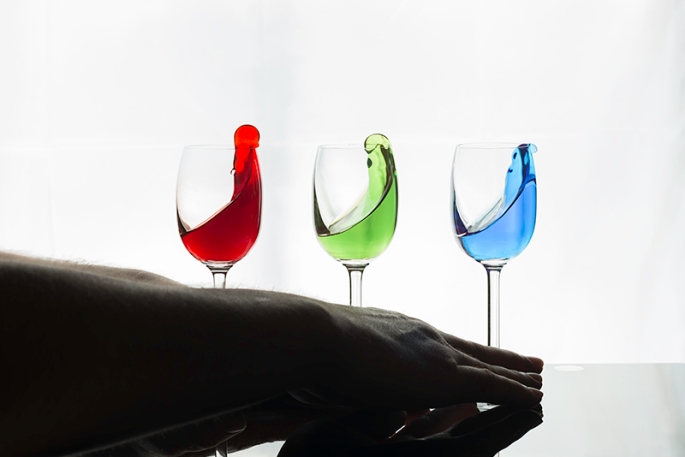
Here is the final result

In Video bellow is a tutorial on how I created the final image
All was good, but then I thought of something else.Why not create motion to the liquid?
So I got the table leveled again and asked my wife to take some shots while I was moving the glasses.
This was very tricky to get it right, but after just 2 attempts I got what I wanted, so here is the image of me moving the glasses
The way I moved was so the glasses would be on the exact same plane of focus to ensure that they would be in focus.
Here is the final image

Also, I created a video on how I created easily this image
I hope this post inspired you in any way and feel free to share this post and if you produce any images related to this blog post, feel free to share it with me.
Have a great week,
Miguel


