Today I would like to talk about photographing with blue sky, I’ll explain…
Sometimes when traveling or even just going for a walk we encounter lots of problems, its either harsh shadows, no detail on the shadows and a very common (not if like me you live in London), a true blue sky, with not even a cloud to add interest to the sky. Fair enough, you have a great subject and you created the perfect composition, but with a plain blue sky, its like something is missing.
But there is a super easy way to fix that! No, I am not talking about replacing the sky. Well, instead of replacing the sky, why not add a cloud or two?
In Photoshop not only is very easy, but also creating a brush, you can actually use it over and over again in different images, so bellow you find a video tutorial where I show you exactly how to do it.
I hope it helps with your own images.
Today I would like to talk to you about 360 degrees panoramas.
With Facebook allowing us to post 360 degrees panoramas created with our phones or other mobilde devices we can have a super cool experience and move around on the images, I really like it a lot, it gives you the feeling that you are actually there.Also, some camera manufacturers started selling some cool 360 degrees cameras…
But even that either using a phone or a proper 360 camera it looks cool, its never as great as doing it using a dslr, as dslr’s are not only sharper, but also the fact you shoot raw, you have a lot more to work with.
So I created a tutorial where I can show you a way to go around the situation so that you can use your dslr to photograph the panorama and with the help of Photoshop you can actually trick Facebook to think that you used a 360 camera.
All is good, but what about Instagram?
Everyone likes Instagram, but it won’t allow you do upload a 360 panorama.
So I came up with an idea, instead of a panorama, why not upload a video that will give you the feel of the 360 panorama.
I hope this post and videos will help you.
If you have any questions, feel free to contact me and I will do my very best to help you.
Today I would like to point out the importance of shooting in Raw.
A lot of people prefer to shoot jpeg because it looks better or because when they see the image in the back of the camera, it doesn’t look the same on a computer, it looks flat…
Well, jpeg files not only are compressed files, but also they don’t have as much data as a raw file, therefore you are always limited to what you want to achieve. Also
I get people saying that the jpeg looks better than a raw file, a raw file is just plain raw, therefore, it will never look like a jpeg, so even if you shoot raw, the camera will show you a jpeg preview of the image, so when you take the image to a computer it will look flat. But it can easily be fixed. The very basic processing on a raw file is the white balance, the contrast and sharpeness. Ok, fair enough, when you start processing an image, we always do more than that, but because its a raw file, it has lots of information, so, with more information, means a lot more control, not only to your image, but also how creative you want to be.
Bellow there is a link of a video I did a couple of weeks ago, where I process a raw file and turn a boring image to an awesome image.
I hope this helps you realize that shooting raw is not scary and its actually the way to go.
Today I want to share with you that with the help of Photoshop, your imagination is the limit…
Last year or so, I waspaying around in the studio with a bottle and some glasses, but everything I was doing, even that it was cool, it was vulgar, the sort of images that you Google and you find hundreds of similar results.
So I thought about doing something different, a bottle pouring some “whisky” to some glasses, but with a twist.
I wanted the bottle floating ans so the glasses, so I started planning. Grabed some electrical tape and taped the glasses to a couple of tripods and startedpouring the drink. By the way, I used ice tea instead of whisky, it looks the same but its cheaper and to be honest it would be a waste of some good whisky.
And here is the result
Also, I did a tutorial where I show you how I created the image.
As for me, well, after having some issues with my computer, finally its all solved, therefore I want to show you how I setup Photoshop for the first time.
I will create my own workspace, then I go to the preferences menu where I change some settings to suit not only my workflow, but also performance.
After leaving the preferences menu I will load some actions, brushes and shapes.
I hope this blog and video tutorial will help you get started with Photoshop
Have a fantastic weekend,
As for me, I had some problems with my main computer, there I had to re install Lightroom and of course import old catalogs.
But how hard is it?Actually its quite easy and simple…
First I would like to tell you that I had the Catalog and the images backed up, so my first step was to put the Catalog and the images in the same location as before, in my case was on my pictures folder.
After the images and catalog were back where they were suposed to be, deleted the catalog that
Lightroom created automaticaly when first opened Lightroom. Then I opened Lightroom and I got this window
On that window, I chose “Chose a Different Catalog”!
Just after I got another window, like this
In this window I located the Catalog, in my case for this post I am using a Catalog that is syncronized with my Lightroom Mobile and chose it.
Then I got another window
And on that window, with the catalog selected, I just clicked “Open”
And I got all my images imported as they were before, now all I have to do is let it syncronize with my Lightroom Mobile.
It took just a few minutes and I am ready to go!
I hope this helps you, so if you need to add a Catalog to a second computer or as in my case, do a clean install, its rather easy and simple.
Have a fantastic Weekend,
Miguel
Hi everyone, I hope you had a fantastic Weekend!
As for me, I’ve been playing with some glasses and food colouring, not to mention Photoshop.
As you may know, if you follow me on Social Media Websites, I have been playing with some still life.Its very rewarding and interesting as I get to understand a lot more of how lights work in different surfaces and working with some reflections it takes the learning to the next level.
So, this weekend I decided to create something a bit more dynamic!
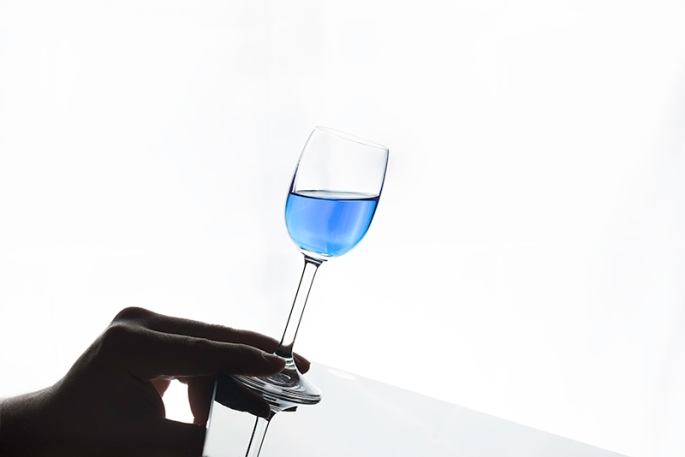
The first step was to get some Red, Green and Blue food colouring, this way I could create an RGB image.But just photograph 3 glasses with some coloured liquid felt too simple, so I decided to play with gravity…
The setup was very simple, a small black gloss table and a Soft box just behind it with my speedlight at 1/4 of power.
I had my camera on a tripod with a 105mm macro lens as the glasses were “Port glasses”, therefore quite small.
I shot the images at 1/150th of a second as I wanted to get the least amount of ambient light as possible at ISO 100 and F/11
So here is the first shot
As you can see, it looks decent, but I knew I could make it more interesting…
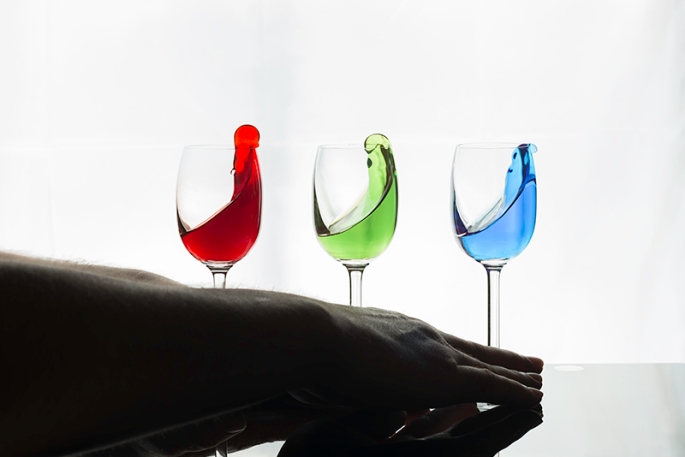
So, I grabbed a small cardboard box and put it underneath one side of the legs of the table, this way the table had an inclination of around 30 degrees.Having the table ready I started taking some photos of individual glasses, like this…
Now all I had to do was to take all the images to Photoshop and bring all of those images together.
Here is the final result
In Video bellow is a tutorial on how I created the final image
All was good, but then I thought of something else.Why not create motion to the liquid?
So I got the table leveled again and asked my wife to take some shots while I was moving the glasses.
This was very tricky to get it right, but after just 2 attempts I got what I wanted, so here is the image of me moving the glasses
The way I moved was so the glasses would be on the exact same plane of focus to ensure that they would be in focus.
Here is the final image
Also, I created a video on how I created easily this image
I hope this post inspired you in any way and feel free to share this post and if you produce any images related to this blog post, feel free to share it with me.
Today I would like to talk about Creative Cloud.
As many of you know Creative Cloud is a subscription based way that Adobe found to allow millions of people to have their latest products in a more affordable way.
When first was introduced many users weren’t happy and some, still not happy, but Creative Cloud is great!
For less than £9 you can subscribe for the so called Photography Program, with that you get Photoshop, Lightroom, Bridge and many mobile apps, for both IOS and Android that I absolute love and use very often, (but that is a chat for another day).
Also, as part of the Creative Cloud subsbriber, you get 20Gb free storage.Fair enough, these days 20Gb is not a lot, but its very useful, and when working and combining a workflow between mobile apps and desktop apps, its absolutely fantastic!
But you can do more than that, you can use it as a private gallery.All you have to do is make the link visible so the people with that link can view the images, not only that, but also comment on the images and even download.It not may seem a lot, but if you would like to share a photoshoot to a client easily and in a very professional way,I think its great.
Personally I use it for my private portfolio, the reason why is private is that I respect my clients privacy, therefore I am not publishing everything I do online, but having that as a private “Gallery” with the Creative Cloud on my phone and iPad, its easy to show future clients some of my work.
You could also use it as a link visible to all and use it as a Portfolio page, but Adobe also offers you “Adobe Portfolio”, but that, is a chat for another day 😉
Here is a video just to show you how easy it is to use Creative Cloud as I mention above.
New Years Eve just before midnight I setup my camera and tripod to capture the New Year’s London Fireworks.
In case you wonder, my camera settings were, f/8 Iso 200 and the shutter speed was at 1 second. The camera not only ws in manual, but it was also in “mirror lockup”, to avoid any movement created by the shutter, and of course, I had a remote that was on continuos shooting, therefore just kept taking photos automaticaly without me needing to touch either the camera or the tripod.
The result as you may see on this tutorial, is lots of images, that using Photoshop I created a timelapse very easily and quickly. Well, the rendering took a while, but whilemit was rendering gave me time to have a nice cup of coffee 😀
I hope you enjoy this tutorial,